Your Retailer Spec Sheet Just Landed. Here's What It Takes to Hit It Across Macy's, Bloomingdale's, Nordstrom & Saks
The email arrives from your buyer's team with an attachment: Image_Specs_FINAL_v3.pdf. On-sale date is already locked. And somewhere between the line review and the launch calendar, hitting these specs across your whole catalog became your problem.
If you manage ecommerce product photography for a wholesale fashion brand, you know the feeling. Getting the order is the milestone everyone celebrates. Getting a few 1000 product SKUs each with 4-8 images through the image requirements of four retailers at once is the part that quietly eats your launch - and it lands on your desk, not the buyer's.
Before the four spec sheets, though, it's worth naming what this job actually is - because it isn't the one your photographer was hired for.
What Is Ecommerce Product Photography?
Ecommerce product photography is the work of producing commercial-grade images of a product for sale online - on your own online store front, on marketplaces like Amazon, and through wholesale retail partners like Macy's or Nordstrom. It covers white-background packshots, on-model shots, flat lays, detail close-ups and lifestyle images, each produced to the technical requirements of the channel it's headed for.
That last clause is where wholesale changes everything.
For most brands, product photography is a creative brief: good light, clean composition, something that makes the product look worth buying. The moment you sell into a marketplace, it becomes something else. Your images stop being judged on how good they look and start being judged on whether they hit a spec - an exact pixel dimension, a specific background colour value, a file format, a DPI, a crop line measured against a model's face. Miss one and the image bounces, no matter how beautiful it is.
So that's what this guide is about. Not how to take the photo. What it takes to get 1000s of ecommerce photos you already have through four different retailers' rulebooks before the on-sale date.
Why Product Photography Matters for Ecommerce Conversions?
It's worth understanding why retailers care this much, because it isn't bureaucracy - it's documented UX practice, and they're following it.
Nielsen Norman Group (NN/G), the usability research firm founded by Jakob Nielsen and Don Norman studies how people actually shop online. Their research on product listing pages found that consistency across product photos is what makes a category page usable at all. When every image shares a style, shoppers can scan and compare; when they don't, the page stops working. NN/G's list of what has to stay consistent will look familiar if you've read the spec sheets above: background, orientation and direction, context, lighting, and scale.
They found it in the lab. On one designer footwear site where every shoe was photographed with the same lighting, on white, in the exact same side view, a study participant could scan the grid and pick out heel heights at a glance - she described the site as easy and well laid out. On another fashion site, the photos were large but full-length, and shoppers struggled to tell which garment in the outfit was actually for sale. Same budget, same production values. Different framing rule, different outcome.
And here's the part that explains your inbox. NN/G's explicit recommendation to retailers is to "create strict, specific product photo guidelines, and ensure they're followed by sellers and suppliers." Their example of a retailer doing this well is Amazon, which holds photos roughly consistent across an enormous number of third-party sellers by publishing standards and enforcing them.
That's what the PDF from your buyer's team is. Not red tape - the retailer doing exactly what the research says they should, with you on the supplier side of it. Their category grid has to work across hundreds of vendor brands feeding the same page, and it only works if your images are indistinguishable in style from everyone else's.
Which means the retailer isn't asking your photography to be good. They're asking it to be identical - because that's what converts. And that's a very different problem from the one your photographer solved.
The two options on your desk, and why neither feels good
Once the sheet lands, you've basically got two levers, and you already know the downside of each.
Outsource it. Hand the catalog to an editing/seller agency or offshore team. It works, but you're paying per image, waiting on turnaround, and burning cycles on project management, revision rounds every time a background isn't quite clean or a crop position drifts. Multiply that by 4 retailers with 4 rulebooks and the cost - and the calendar - balloon fast.
Keep it in-house. Your own graphics team is good. They're also already underwater with everything else the business needs from them this quarter. Dropping a full catalog reformat on them means something else slips, or overtime, or both. And it's genuinely unglamorous work: nobody on a creative team wants to spend two weeks resizing on-model back views to a spec sheet.
So you do what everyone in your seat is doing right now: you look at the AI buzz and wonder whether this is the thing you can finally take off the plate. Which is the right instinct, as long as you know which parts actually automate and which don't. We'll get to exactly that below.
How the specs actually reach you (messier than a webpage)
First, the thing that makes this harder than it should be: these requirements rarely live on a tidy public page.
Usually the sheet arrives as a PDF from your account team, or it's buried in a vendor portal you got access to during onboarding - macysnet for Macy's and Bloomingdale's, the Nordstrom vendor portal for Nordstrom, the Saks vendor partners portal for Saks. Some of it is public; a lot isn't. And official guidance often includes a line like "these differ from the general GS1 image guidelines - confirm with your merchant partner." Translation: the real spec is whatever your buyer's team says it is this season.
And these aren't suggestions - they're checks
Off-spec images don't get a polite warning. They get rejected at upload or flagged in QA by the marketplace, and you're back resizing, cropping while the on-sale date slides. Department stores run on floor-ready, listing-ready standards - the entire model assumes your assets arrive correct. Miss the background rule or the framing rule and the image bounces; repeated non-compliance can carry real penalties further down the chain.
So the job isn't "make nicer photos." Your photography is fine. The job is: take shots you already have and conform them to 4+ different rulebooks, fast, without re-shooting.
The shot list: what your retailer actually demands per SKU
Before you can hit a spec, you need to know how many images you owe. This is where the number gets uncomfortable: a single SKU rarely means a single photo. Marketplace portals typically expect 4 to 8 images per product, and they're not variations on one shot - they're different types, each with its own rules.
The types that show up on department store spec sheets:
- White-background packshot - the product alone on pure white. The hero. Every retailer in this guide requires it, and it's the one with the strictest background rule (RGB 255,255,255, no exceptions except Nordstrom & Bloomingdale's shadow allowance).
- On-model - a person wearing the product. Required across apparel at all four major US retailers, and the only type with framing rules about a human body: crop line, feet margin, framing tier.
- Flatlay - top-down, the garment laid flat on a surface, no model. Carries its own margin spec (Macy's 170/530, Nordstrom 400/830).
- Detail / close-up - texture, stitching, hardware, fabric weave. What a shopper zooms into. This is why the resolution floors are so high.
- Alternate angles - front, back, side, three-quarter. Each has to match its siblings exactly, which is where manual editing quietly falls apart.
- Swatch - a small colour/texture tile, separate from the product image. Macy's specifies 200 × 200 px; Bloomingdale's requires them for textiles and multi-colour variants. Easy to forget until a listing is blocked on it.
- Lifestyle - the product in a real setting. Less often mandated by department store portals, more often needed for your own PDP and campaigns.
Now do the arithmetic. Seven types isn't unusual. Multiply by a few thousand SKUs. Multiply again by four retailers who each want different dimensions, crop lines and margins for the same seven types. That's the actual size of the job that landed in your inbox - and it's why "we'll just have someone crop them" stops being a plan somewhere around the second retailer.
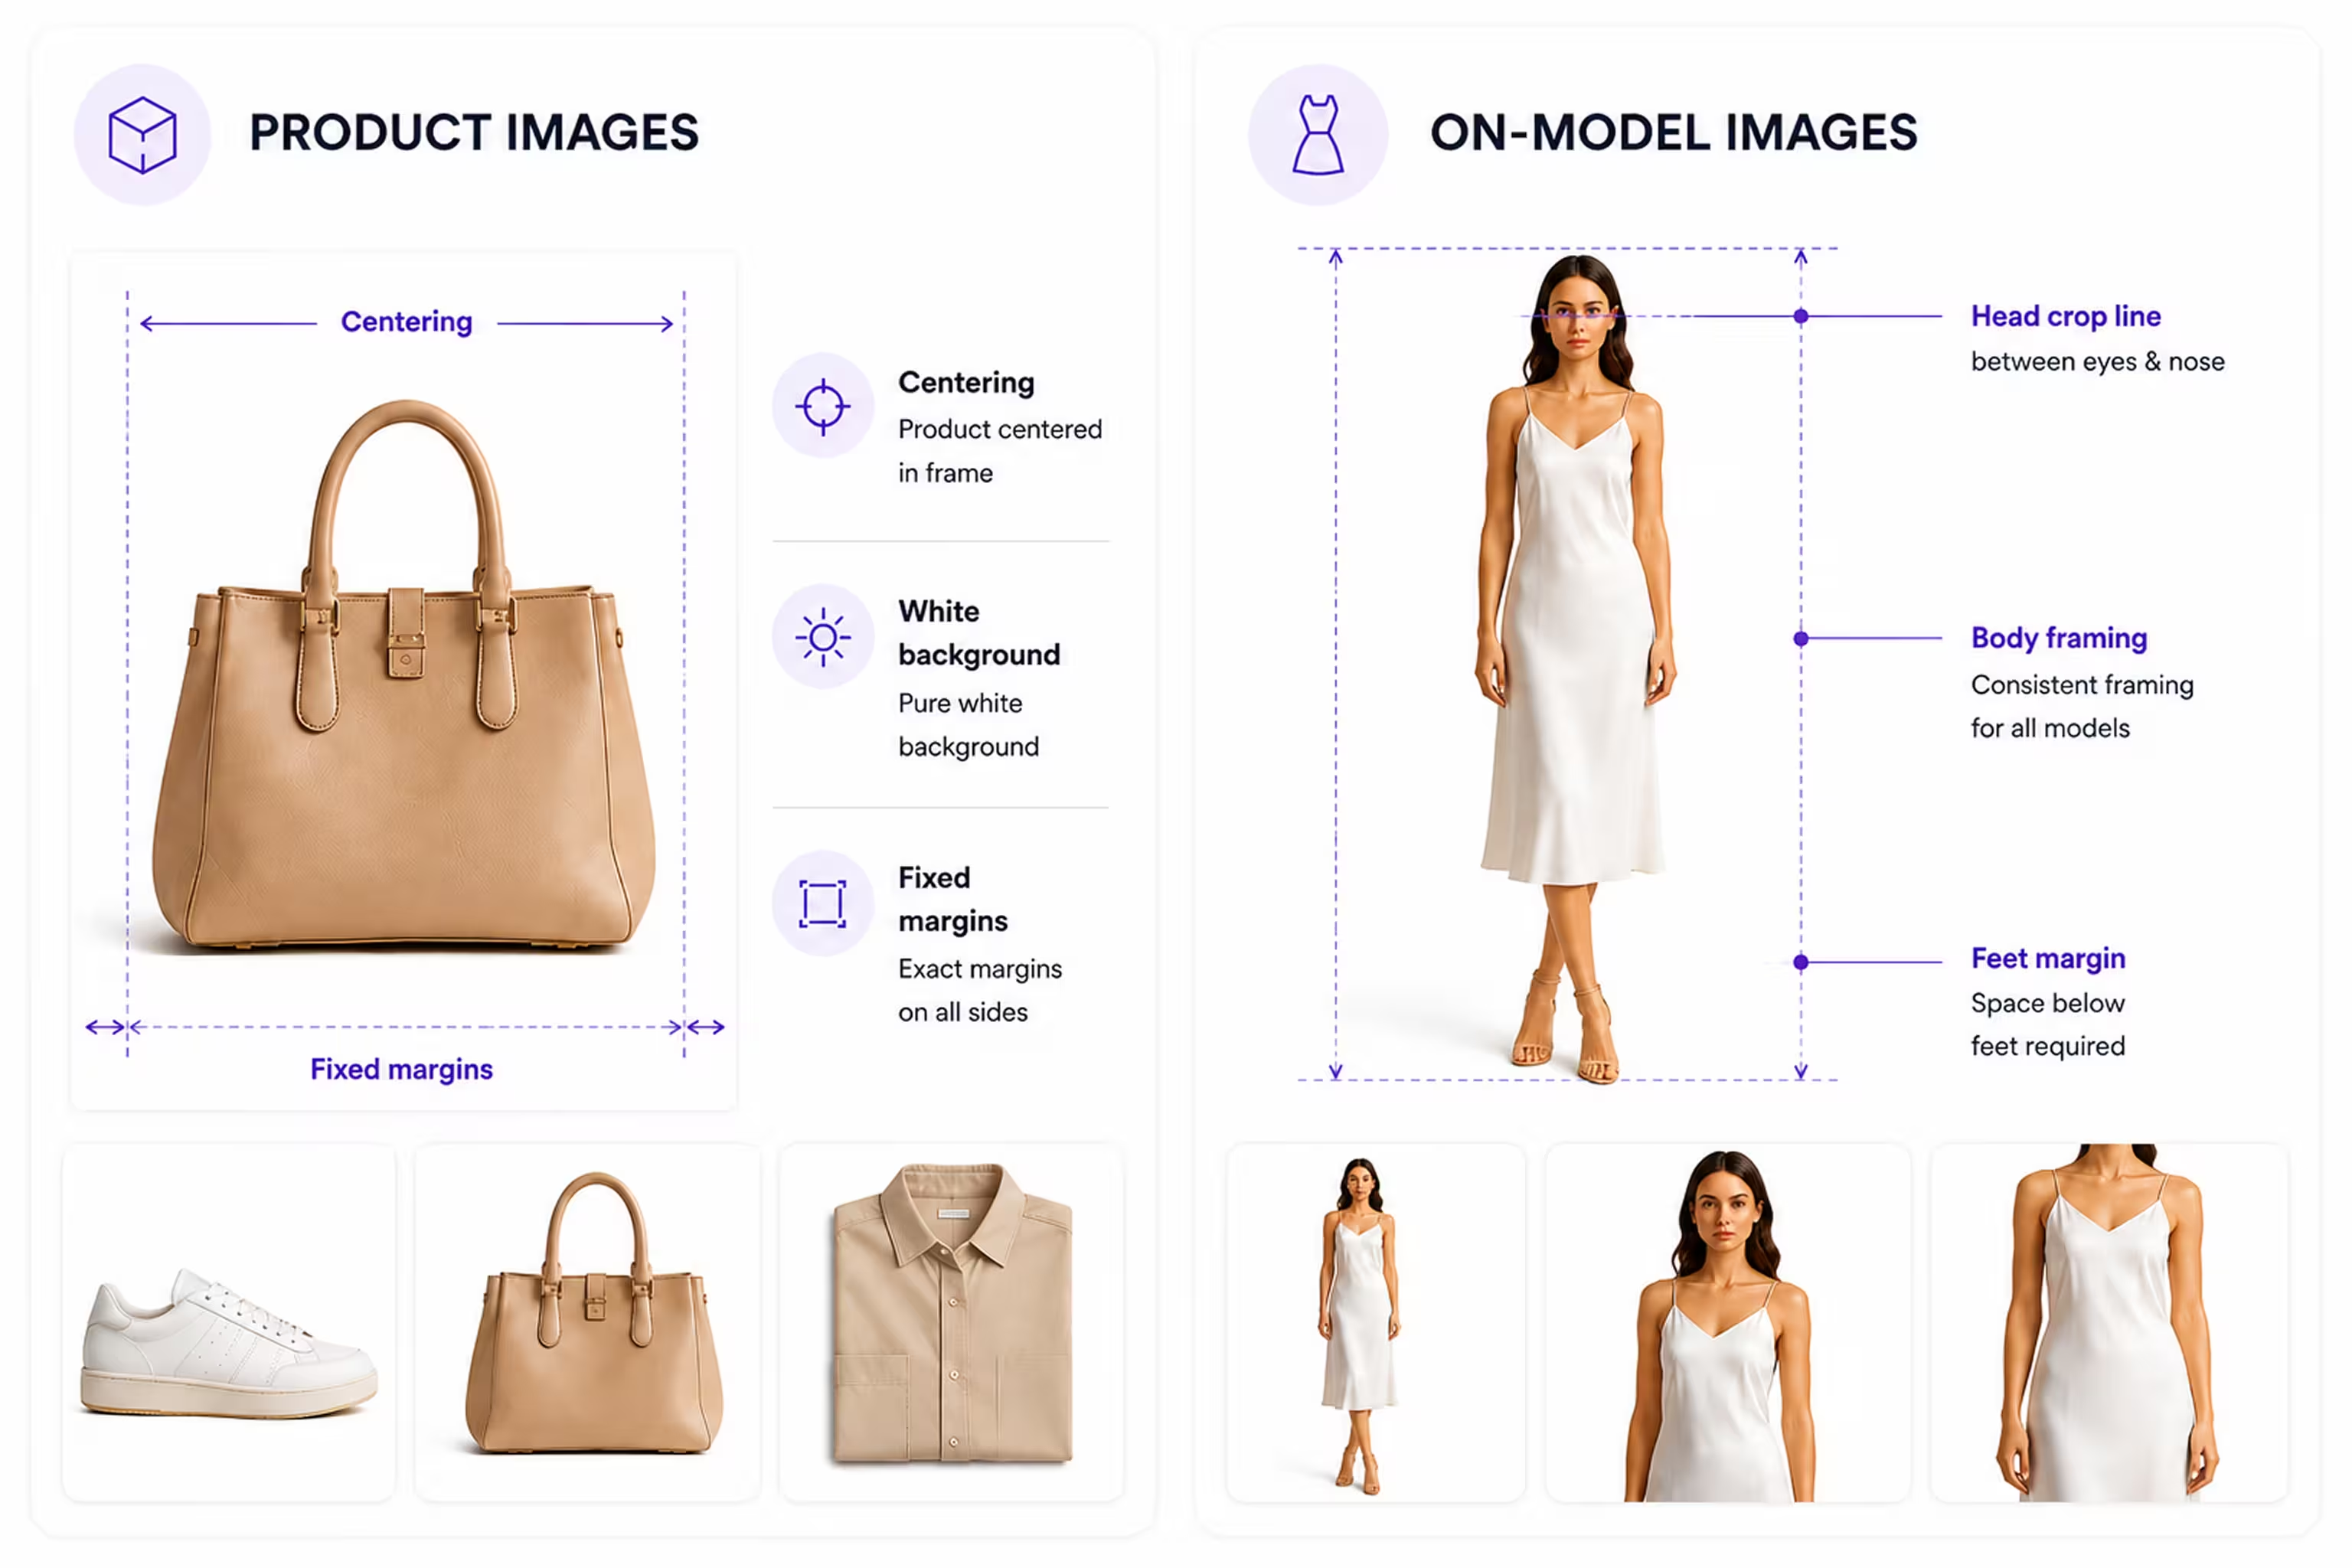
First split every spec sheet in two: product shots vs on-model shots
Here's the thing most people miss when they estimate this work. Every retailer spec sheet is really two sheets stapled together, and the two halves automate very differently.
Product shots - the garment, shoe, or accessory alone, no person. Flat lays, packshots, three-quarter shoe angles. These are pure geometry: put the object on white, center it, resize to the frame. No human judgment about where a person’s body sits. This is the safest, most fully automatable half.
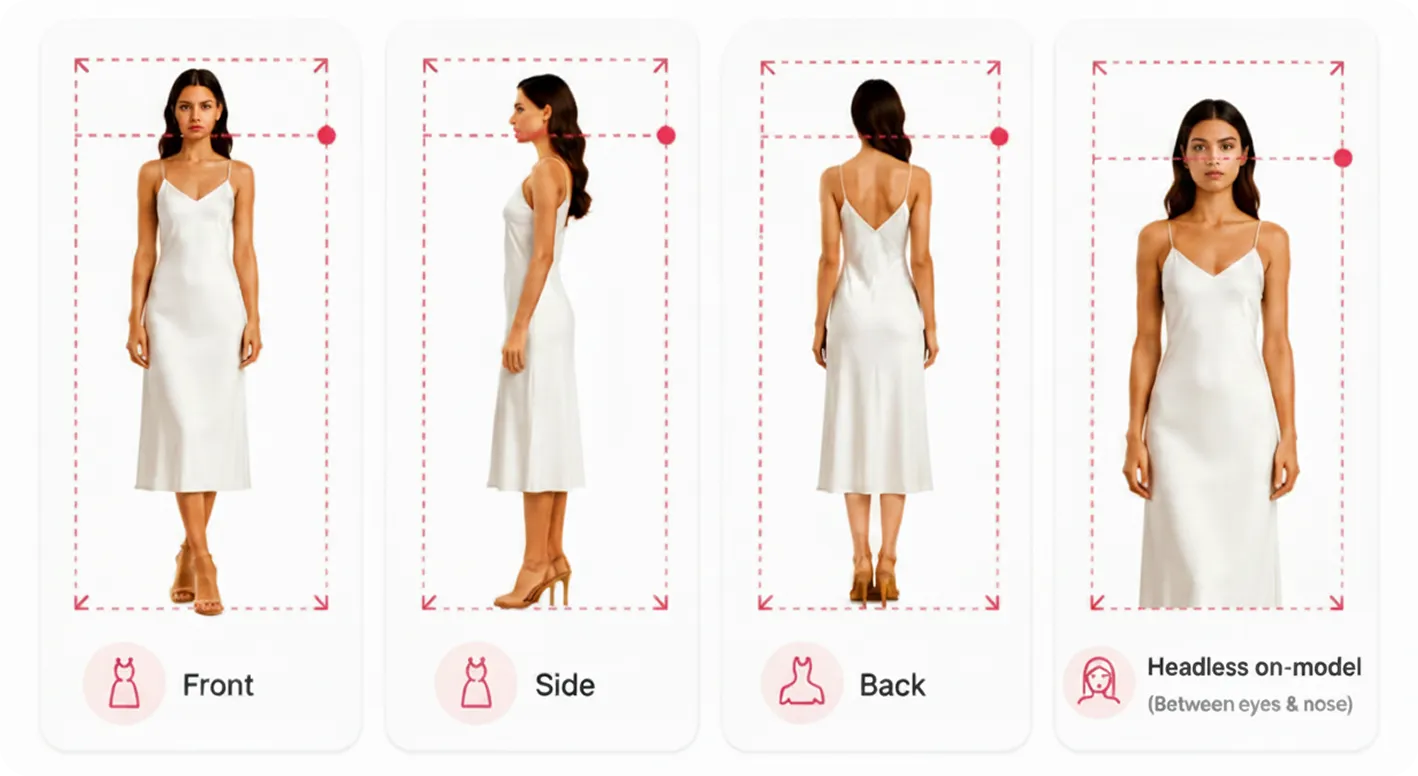
On-model shots - a person wearing the product. This half carries rules a product shot never has: where do you cut the head (the "headless crop" line), how much room do you leave below the waist, knees or feet, and whether the frame is full-length, three-quarter, or torso-only. This is the half everyone's actually nervous about automating - and the half we'll spend the most time on.
What each retailer actually wants
Product shots - the specs
Dimensions and background, per retailer. (Marketplace-track figures shown where public; wholesale/PDP specs come from your account team.)
For bags, flat lays and shoe angles, spec sheets also fix margins - e.g. a set top/bottom and side margin for flat lays, and separate max pixel margins for lengthwise vs three-quarter shoe shots - so a footwear grid lines up shoe-to-shoe. Those numbers are retailer- and program-specific; get them from your sheet.
On-model shots - the specs everyone underestimates
This is where the spec sheet stops being about dimensions and starts being about framing a human body consistently across thousands of images. Three rules do most of the work.
1. The headless crop line - where the top of the frame cuts the head. For headless on-model images, retailers don't say "remove the head," they specify exactly where the cut lands, and it varies:
- Between the eyes and nose - a higher cut (Nordstrom-style).
- Between the nose and mouth - a lower cut (Amazon- and Bloomingdale's-style).
- No face crop at all - full head kept in frame (some footwear and off-price programs).
A few pixels of drift here is a rejection, because it breaks the uniform look down a category page. This is the single most fiddly thing to do by hand across a catalog - and, done right, one of the most mechanical to automate.
2. The margin below the feet (and above the head). Full-figure shots specify a maximum top/bottom margin - typically in the range of ~20–50 px depending on retailer - with one important piece of logic: it's a max. If the model's body already reaches the bottom edge of the frame, you add no margin; if the body floats short of the edge, you pad up to the max. That conditional is exactly the kind of rule a human editor gets subtly wrong on image #743.
3. The framing tier - full-length vs three-quarter vs torso-only. Dresses often run full-length or thigh-to-head; tops and jackets run torso-only or three-quarter. The spec sheet dictates which, and every SKU in a set has to match so the grid reads cleanly.
What good input looks like (because automation can't invent what the camera missed)
None of this works if the source files are wrong. Automation reformats what you give it; it doesn't rescue it. So before the specs are anyone's problem, three things about capture matter and each maps to a number in the tables above.
Resolution. Nordstrom's on-model frame is 3,900 × 5,850 px. That's roughly 23 megapixels - a real camera, not a phone snap, or a lower-resolution original lifted by AI upscaling (more on that below). Macy's on-figure 3,894 × 4,755 is about 18MP. If your studio is exporting at 1,500 px because that's what your own PDP needed, you're under the floor before you start.
Background. Pure white means RGB 255,255,255 - an actual measured value, not "looks white." A grey-ish studio sweep photographs as 248,248,248 and fails. You get there one of two ways: a controlled shoot that lands on true white, or background removal in post. Most brands end up doing it in post, because a shoot that nails 255 on every SKU across every lighting setup is harder than it sounds. Note Bloomingdale's wrinkle: white background, shadows and reflections retained - which rules out a crude cut-out.
Format and DPI. Your export settings aren't one-size-fits-all. Bloomingdale's and Nordstrom take TIFF at 300 DPI; Macy's and Saks take JPEG at 72. Same photograph, four different export routes. This is the least glamorous line on the spec sheet and one of the most common reasons a batch gets kicked back.
The honest summary: shoot clean, shoot big, and don't try to nail every retailer's background in-camera. Capture the best possible master and let post-production do the conforming.
The pattern hiding inside the four spec sheets
Step back and the rulebooks rhyme: pure white (or white-with-shadow) backgrounds, product centered and consistently sized, fixed on-model framing and crop lines, and zoom-grade resolution. So don't build four pipelines - build to the strictest version of each rule once, then derive each retailer's variant from that master.
Shoot once, derive four: the master-file approach
If the four rulebooks rhyme, you don't need four shoots or four pipelines. You need one master file per shot, built to the strictest version of every rule, that each retailer's variant can be derived from.
In practice that means:
- Shoot to the tallest floor. Nordstrom's 3,900 × 5,850 is the highest bar of the four, so it becomes everyone's bar. Anything you can satisfy for Nordstrom, you can downscale for Bloomingdale's 1,200 × 1,500. Downscaling is lossless; upscaling isn't.
- Capture wider than the tightest crop. Shoot the full figure with room around it. Every framing tier - full-length, three-quarter, torso-only - can be cropped out of a full-length master. None of them can be recovered from a torso shot, unless you want to try generative fill with AI.
- Shoot the whole angle set, every SKU. Front, back, side, three-quarter. It costs minutes at the shoot and is unrecoverable later; a missing back view means a re-shoot, not a re-crop.
- Master to clean white; add shadow in post. Pure 255 white satisfies Macy's, Nordstrom and Saks. Bloomingdale's shadow-and-reflection requirement is a post-production step applied to that same master - not a second shoot.
- Leave format and DPI to export. One master, four export routes: TIFF/300 for Bloomingdale's and Nordstrom, JPEG/72 for Macy's and Saks.
One master file. Four retailer outputs. The shoot stops being the variable, and the retailer-specific work moves to where it belongs - post-production, where it can be automated.
The resolution catch: when your files are smaller than the spec
Look back at those frames — Macy's 3,894 × 4,755 px, Nordstrom 3,900 × 5,850. These aren't web thumbnails; they're zoom-grade, near-print files, and it's true for both halves of the sheet: a flat product packshot and an on-model full-figure both have to hit that pixel count.
Here's what catches brands off guard: your source photography might not be that big. A 1,500–2,000 px studio export — common for product and on-model shoots — can't simply be stretched to 3,900 px. Resize it up and you get a soft, blurry image that fails QA as surely as a wrong crop line or an off-white background.
This is where AI upscaling earns a place in the pipeline, for product and on-model shots alike. Instead of stretching pixels, an upscaling model reconstructs detail — edges, fabric texture, stitching, hardware — to lift a lower-resolution file to the retailer's required frame without the mush. It's the difference between "resize and hope" and actually hitting a 3,900 px spec from a smaller original. And crucially, upscaling doesn't have to be its own step: it runs inside the same recipe as the crop, background, and resize, so a small image file is upscaled, cropped, and made spec-correct in a single pass — not the background-removal-then-upscale-then-resize slog that point tools force on you.
But can the on-model and hard-angle shots actually be automated?
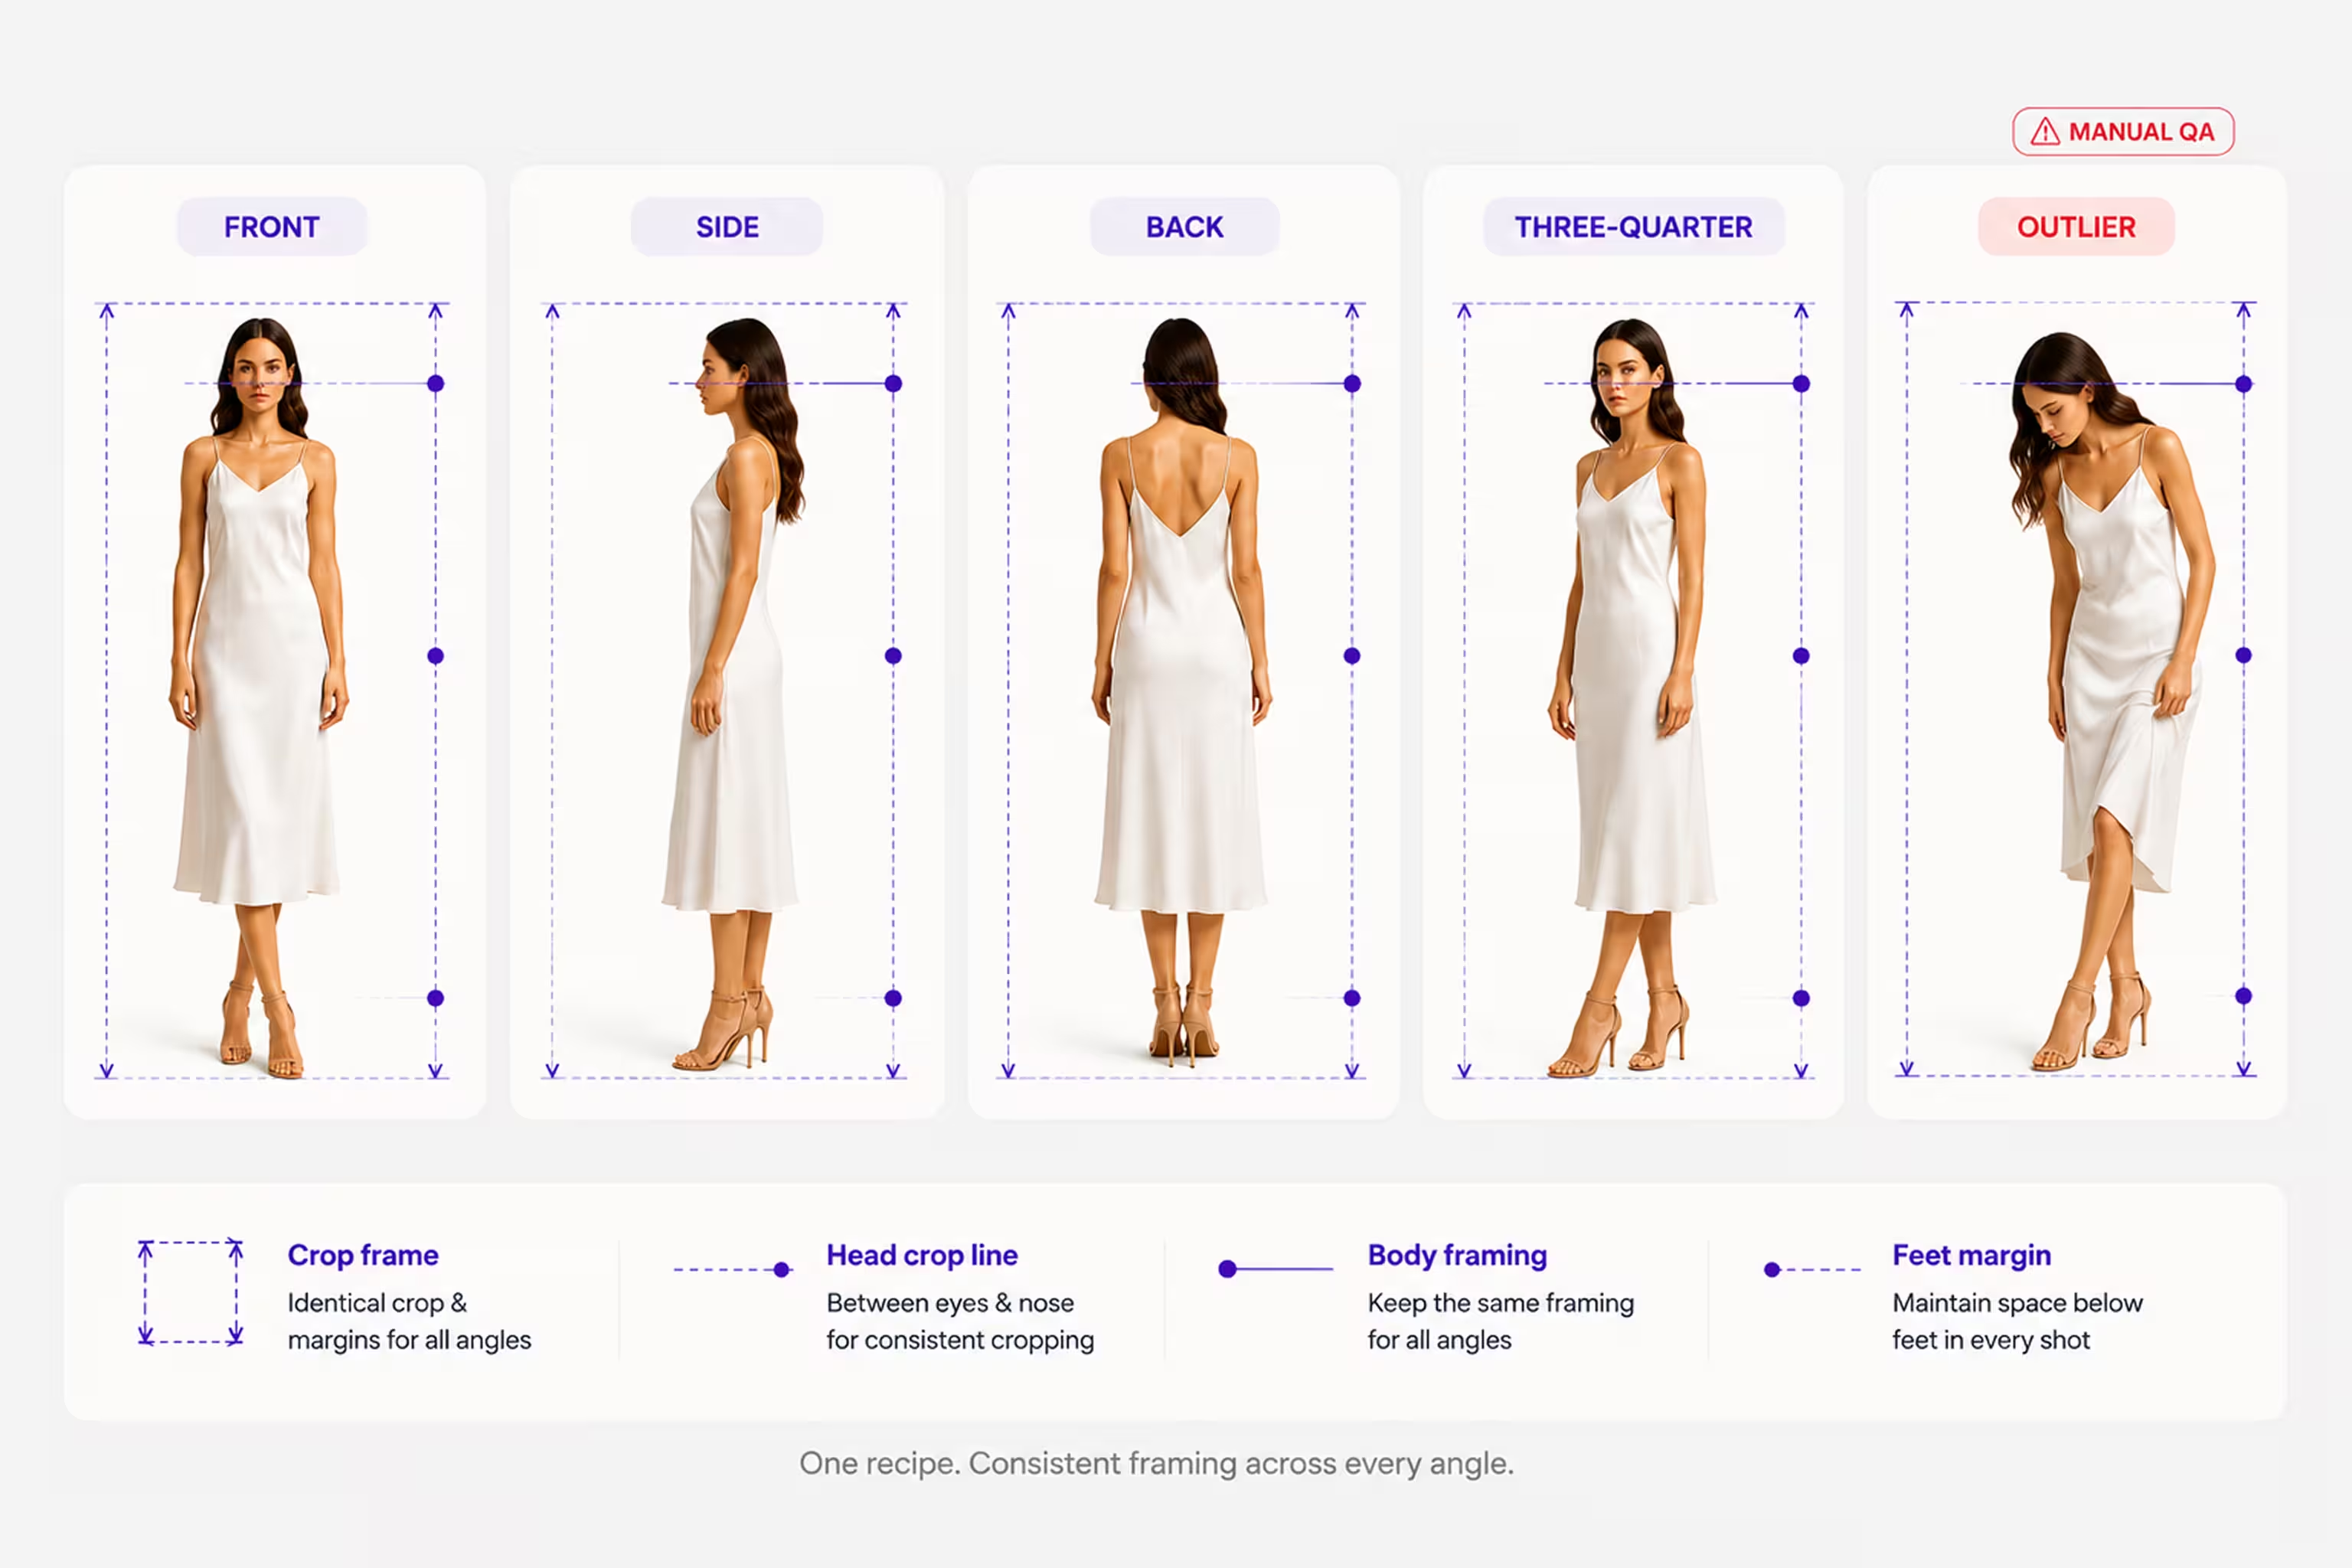
And the on-model shots are where it gets genuinely hard: the side profile, the back view, the three-quarter, the headless crop that has to land on the exact same face-line every time. None of these is difficult to do once — anyone can draw a crop line on a single image. The trouble is doing it identically across the seven or eight images in one listing, then across five retailers that each want a different crop line and margin, then across a few thousand SKUs, all before the on-sale date.
So the honest answer is yes, these can be automated — and the reason matters. The operations are geometric and subject-aware: they find the body in the frame and act on it, so they don't need a face or a front pose. A back view of a jacket is still a subject on a background; the crop, background, and resize logic treats it like the front. The headless crop line is measured off detected facial landmarks, so "between the eyes and nose" lands pixel-identical on image #1 and image #4,000, whether the model faces forward or turns away. The below-feet margin comes off the detected body bottom, including the "touches the edge → no margin" rule. A person could get any one of these right; what they can't do is get all of them right, the same way, thirty-thousand times before the on-sale date.
And the distinction that matters most for a skeptic: this isn't generative AI inventing pixels. Nothing is restyled or hallucinated. Your photography stays your photography — it's reframed to the sheet using subject detection. That predictability is why you can trust it on a back view or a headless crop.
Which is also why you don't have to trust it blindly. What still earns a human pass: extreme angles, transparent or reflective products with ambiguous background edges, unusual props, a subject bleeding off-frame. The workflow isn't "check all 3,000" - it's run the catalog, then QA the outliers. Automation carries the deterministic 90–95%; your eye goes to the handful that need judgment.
Why department store images get rejected and how each one is prevented
Almost every rejection traces back to one of 6 things. None of them is a judgement call, which is exactly why none of them needs to happen twice.
Read that column on the right again. Every one of those is a rule - a value, a facial landmark, a conditional. Not one of them requires visual taste. That's the whole argument of this page in a single table.
The reframe: it's just specs - and specs are automatable
Everything on those sheets is deterministic: a dimension, an aspect ratio, a background color, a crop line, a margin, a file type. No taste, no judgment - which is exactly what you automate. Instead of an editor opening each image, cropping by eye, fixing the background, exporting, then repeating per retailer, you define the output once as a recipe and run the catalog through it - product shots to their frame, on-model shots to the right crop line and body-part driven margins, every SKU consistent. Thousands of images, one pass. And if some source files land under the retailer's pixel floor — whether it's a flat packshot or an on-model shot — the same pass upscales them to spec, so resolution stops being the thing that blocks a launch.
See it on your own images
Upload your own side and back view images. Apply a headless crop recipe and see how well the AI performs.
How a real brand did exactly this: Mavi
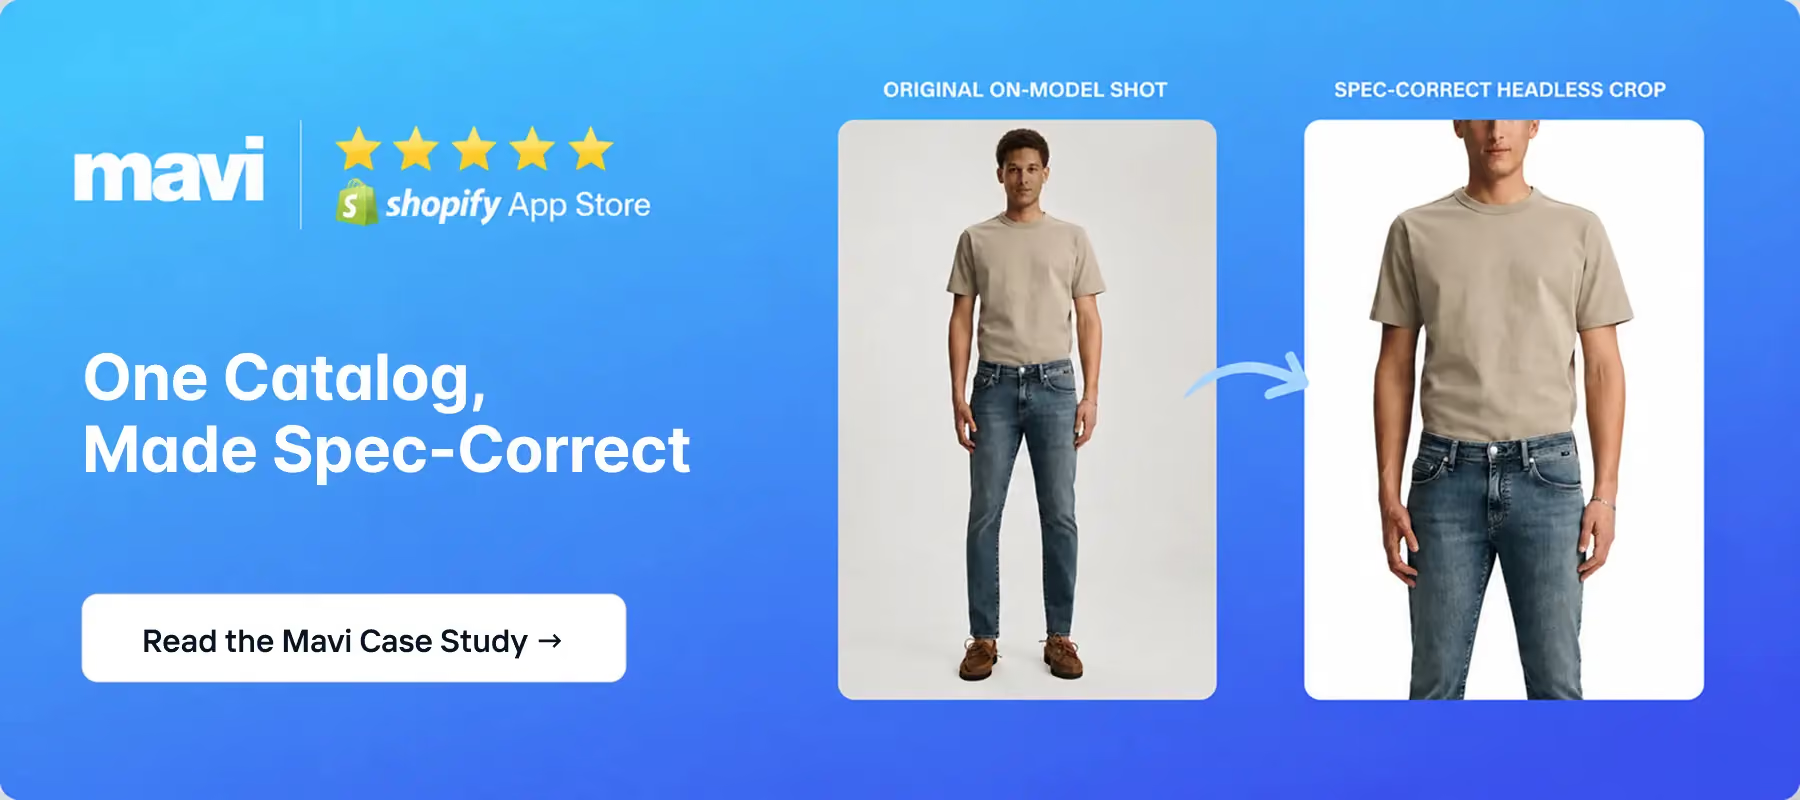
Not theoretical. Mavi - a denim and fashion brand selling into US department stores including Macy's and Bloomingdale's - hit precisely this wall: one catalog, multiple retailers, product and on-model rules, a fixed deadline. Rather than reformat by hand per store, they ran their images through spec-correct AI recipes inside Shopify app and got catalog-ready output without the manual grind.
Where that leaves you
Split every spec sheet into product and on-model. Product shots are pure geometry - the easy, fully automatable half. On-model shots carry the crop line and feet-margin rules that trip up manual work and that body-aware automation handles cleanly. Build to the strictest version once, automate the deterministic 90%, and QA the outliers.
Get the sheet from your account team. Build to the strictest rule. Press go.